ZEuS Lese Neu: Difference between revisions
From ZEuS-Wiki english
→Functions: Erneuerung wegen Responsive Design |
|||
| Line 7: | Line 7: | ||
To create a bookmark, follow these steps: | To create a bookmark, follow these steps: | ||
=== Step 1: Open the page for which you want to create a bookmark === | ===Step 1: Open the page for which you want to create a bookmark=== | ||
First of all, you have to open the page you want to create a bookmark for, for example the '''Courses''' → '''Show university course catalogue''' menu item. | |||
===Step 2: Display the Bookmarks menu=== | |||
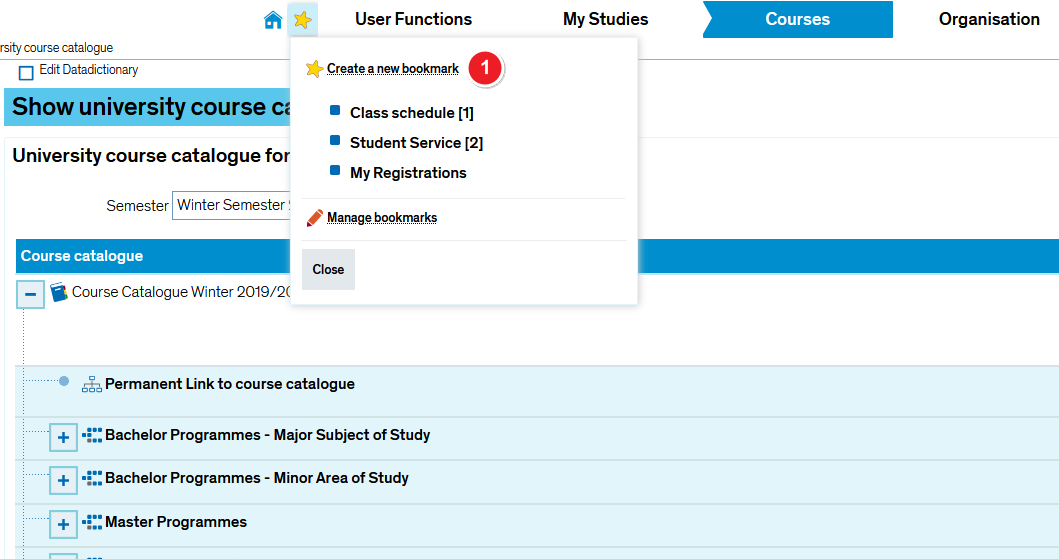
Clicking on the [[File:ZEuS icon Standard.png]] '''Bookmarks''' menu will display the overlay window. | |||
=== Step 2: Display the Bookmarks menu === | |||
Clicking on the [[File:ZEuS icon Standard.png]] Bookmarks menu will display the overlay window | |||
{| style="border: 2px; border-style: solid; border-color: #00a9e0; width: 100%;" cellspacing="5" | {| style="border: 2px; border-style: solid; border-color: #00a9e0; width: 100%;" cellspacing="5" | ||
|- | |- | ||
| Line 25: | Line 24: | ||
|} | |} | ||
=== Step 3: Data entry === | ===Step 3: Data entry=== | ||
The input mask for the bookmark information is now open, so that you can enter all information explained below. | |||
{| style="border: 2px; border-style: solid; border-color: #00a9e0; width: 100%;" cellspacing="5" | {| style="border: 2px; border-style: solid; border-color: #00a9e0; width: 100%;" cellspacing="5" | ||
|- | |- | ||
Latest revision as of 05:33, 17 September 2020
Are you returning to a particular ZEuS page a lot and don't want to navigate the menu every time? You can easily create a bookmark that will take you to the page you need in two clicks.
Functions
To create a bookmark, follow these steps:
Step 1: Open the page for which you want to create a bookmark
First of all, you have to open the page you want to create a bookmark for, for example the Courses → Show university course catalogue menu item.
Clicking on the ![]() Bookmarks menu will display the overlay window.
Bookmarks menu will display the overlay window.
| Click on Create a new bookmark so that the data entry mask will open. |
Step 3: Data entry
The input mask for the bookmark information is now open, so that you can enter all information explained below.


