ALU Hyperlink erstellen: Difference between revisions
From ZEuS-Wiki english
m Text replacement - "{| style="border: 2px; border-style: solid; border-color: #00a9e0; width: 100%; background-color: #cceef9;" cellspacing="5"" to "{| style="border: 2px; border-style: solid; border-color: #00a9e0; width: 100%;" cellspacing="5"" |
m Text replacement - "{{Klappbox-bluespice|Screen shot" to "{{Klappbox-bluespice|File:ZEuS icon Screenshot.png" |
||
| Line 8: | Line 8: | ||
|- | |- | ||
| style="width: 33%;"| | | style="width: 33%;"| | ||
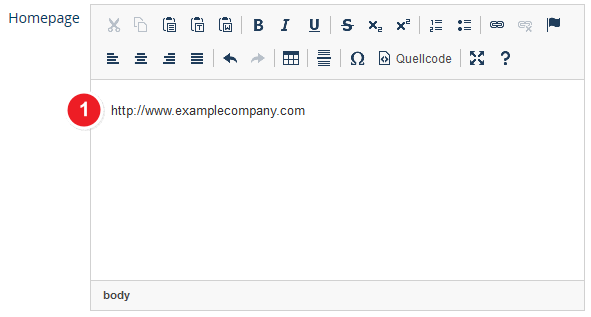
{{Klappbox-bluespice| | {{Klappbox-bluespice|[[File:ZEuS icon Screenshot.png]] ''Step 1: Entry of link text'' |2= [[File:ALU AG Firmenprofil Antrag Internet 1 en.png|none]]}} | ||
|} | |} | ||
| Line 21: | Line 21: | ||
|- | |- | ||
| style="width: 33%;"| | | style="width: 33%;"| | ||
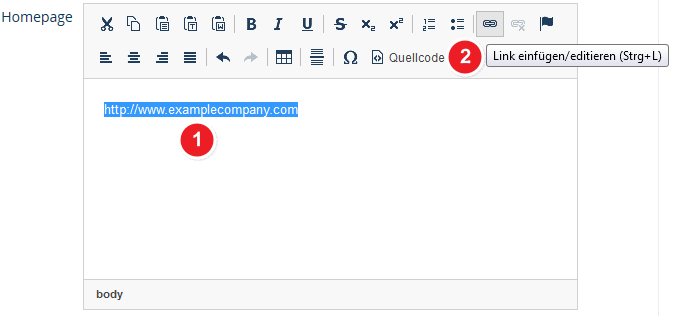
{{Klappbox-bluespice| | {{Klappbox-bluespice|[[File:ZEuS icon Screenshot.png]] ''Step 2: Open the editing screen''|2= [[File:ALU AG Firmenprofil Antrag Internet 2 en.png|none]]}} | ||
|} | |} | ||
| Line 39: | Line 39: | ||
|- | |- | ||
| style="width: 33%;"| | | style="width: 33%;"| | ||
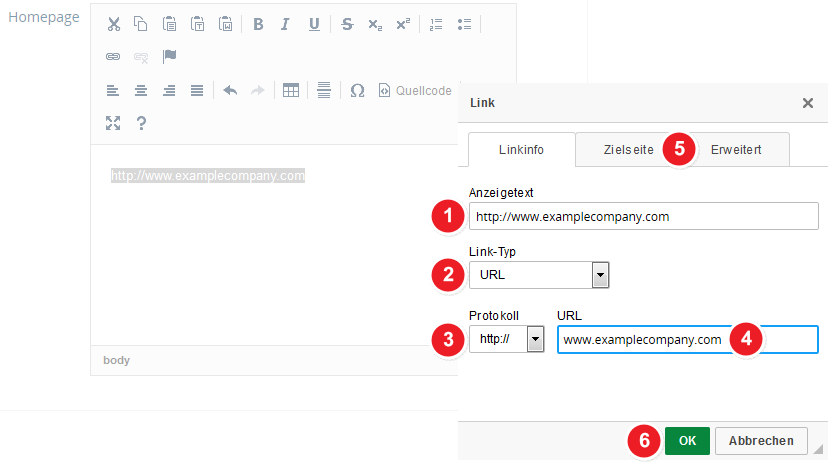
{{Klappbox-bluespice| | {{Klappbox-bluespice|[[File:ZEuS icon Screenshot.png]] ''Step 3: hyperlink properties''|2= [[File:ALU AG Firmenprofil Antrag Internet 3 en.png|none]]}} | ||
|} | |} | ||
| Line 67: | Line 67: | ||
|- | |- | ||
| style="width: 33%;"| | | style="width: 33%;"| | ||
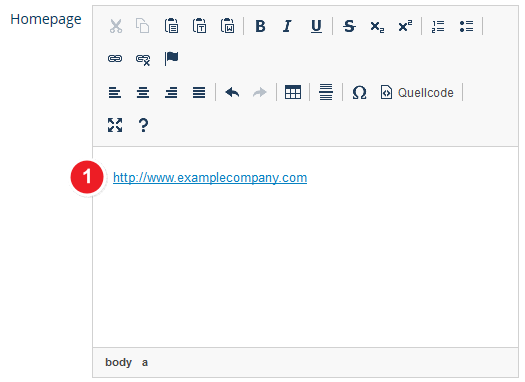
{{Klappbox-bluespice| | {{Klappbox-bluespice|[[File:ZEuS icon Screenshot.png]] ''Step 4: Link completed'' |2= [[File:ALU AG Firmenprofil Antrag Internet 4 en.png|none]]}} | ||
|} | |} | ||
Revision as of 08:33, 9 October 2019
Introduction
There are several entry masks in the company profile, e.g. on the "Main and contact data" or the "Contact persons" tab, where you will find the text field Homepage. It offers you a wide range of editing options which allow to create a hyperlink. Follow the instructions to establish a link to your company's homepage shown in your job offers for the interested persons.
How to
Step 1: Enter the link text
| Enter the text that should be shown as a link in the job offers in the Homepage field. |
Step 2: Open the editing screen
Step 3: Edit hyperlink's properties
You can find all relevant settings on the first tab called Linkinfo shown when the popup window has opened.
Step 4: Hyperlink completed
| Now you can see the text you have added a link to the company's home page. It is written in blue and underlined, as it is usual to hyperlinks. |
