Transfer course and examination data to your own calendar
From ZEuS-Wiki english
Introduction
There are several menu items with course and examination information which offer you the possibility to export appointment data in the iCalendar format (ics). By this, you can automatically transfer data of courses and examinations which you have registered for to your private calendar in order that you will not miss any event.
Depending from the menu item from which you have called the export function, different schedule records will be exported. If you start the process, for example, from your own schedule, all events visible in your timetable will be provided in an export file - every single date of all registered courses and examinations, as well as those you have saved the date for. On the contrary, calling the function out of the course or examination detail view, your file only contains the single dates of all parallel groups available for this event to be transferred to your personal calendar. Naturally, you can delete unnecessary appointment series from your calendar.
Read on to learn the single steps which are essential so that you finally will see the single course or examination dates in e.g. your private Google calendar or in Microsoft Outlook as well - in order to be automatically reminded.
Role
Die Möglichkeit, Veranstaltungs- und Prüfungstermine im iCalendar-Format (ics) in Ihren eigenen Kalender zu übertragen, steht in ZEuS vielen Rollen zur Verfügung, beispielsweise Student/-in oder Lehr- und Prüfungsplanung und anderen mehr.
Vorgehen
Hier erfahren Sie nachfolgend die einzelnen Schritte, bis Veranstaltungs- oder Prüfungstermine in Ihrem eigenen Kalender verfügbar sind. Beispielhaft erfolgt die nachfolgende Beschreibung aus dem Menüpunkt Stundenplan heraus, da dies Funktion vor allem für Studierende von Nutzen ist.
Step 1: Start of export process
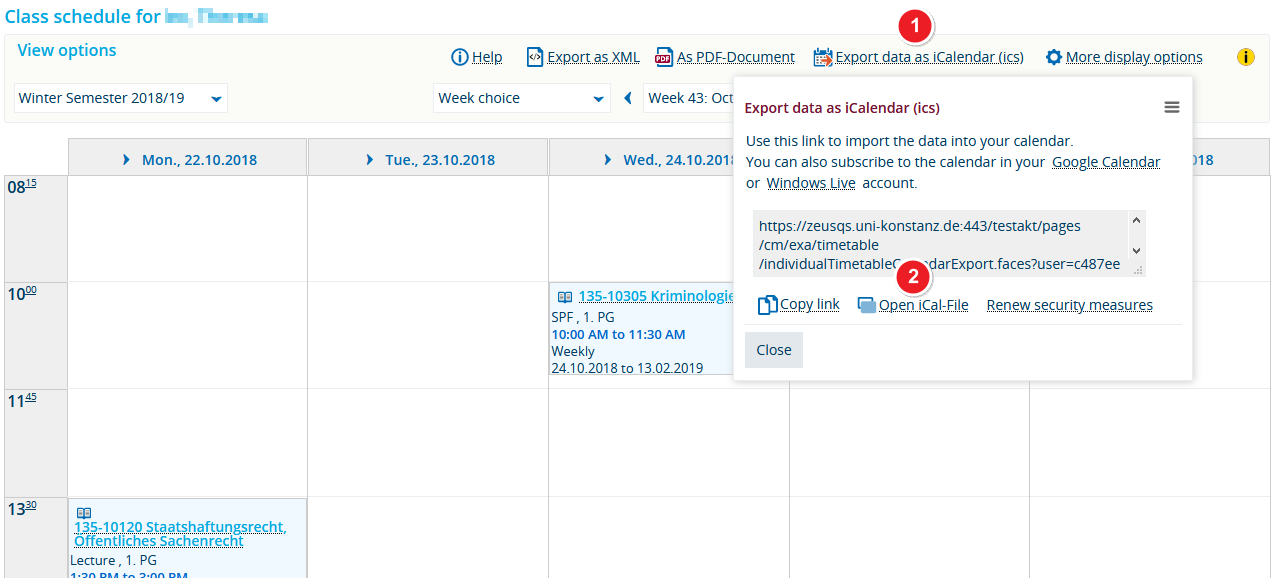
| Click on the Export data as iCalendar (ics) button to start the export process. | |
| Thereupon, a popup window will open. Choose the option iCal-Datei öffnen so that the dialog box will open. |
Step 2: Save ics file
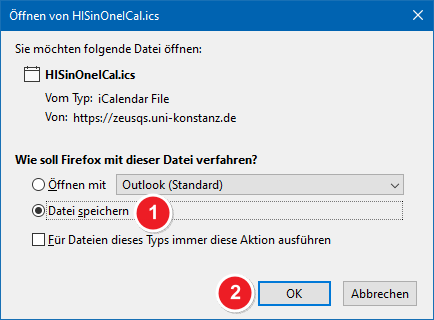
| Wählen Sie die Option Datei speichern, um die erzeugte ics-Kalenderdatei in Ihrem Dateisystem dort abzulegen, wo Sie sie für den anschließenen Kalenderimport schnell wieder finden. | |
| Bestätigen Sie mit Klick auf OK. |
Step 3: Import ics to your calendar
Im letzten Schritt müssen Sie nur noch die gesicherte Datei mit den Termindaten in Ihren eigenen Kalender übertragen. Hierbei gibt es keine allgemeine Anleitung, da dies bei jeder Software unterschiedlich erfolgt.
Beispiele
- Google Kalender: Sehr häufig nachgefragt ist der Import in den Google Kalender. Eine Anleitung hierzu finden Sie auf der Webseite von Google.
- Microsoft Outlook: Möchten Sie die Daten in Microsoft Outlook importieren, finden Sie bei Microsoft Informationen dazu.


