ZEuS Stud SService Kontaktdaten: Difference between revisions
From ZEuS-Wiki english
(→Overview of your current contactdata: Leerzeilen gelöscht) |
(→Processing of your own contact data: Zwischenstand) |
||
| Line 17: | Line 17: | ||
| style="text-align: left; vertical-align: top; width: 50px;" |[[File:ZEuS_Stempel1.png|none|24x24px]] | | style="text-align: left; vertical-align: top; width: 50px;" |[[File:ZEuS_Stempel1.png|none|24x24px]] | ||
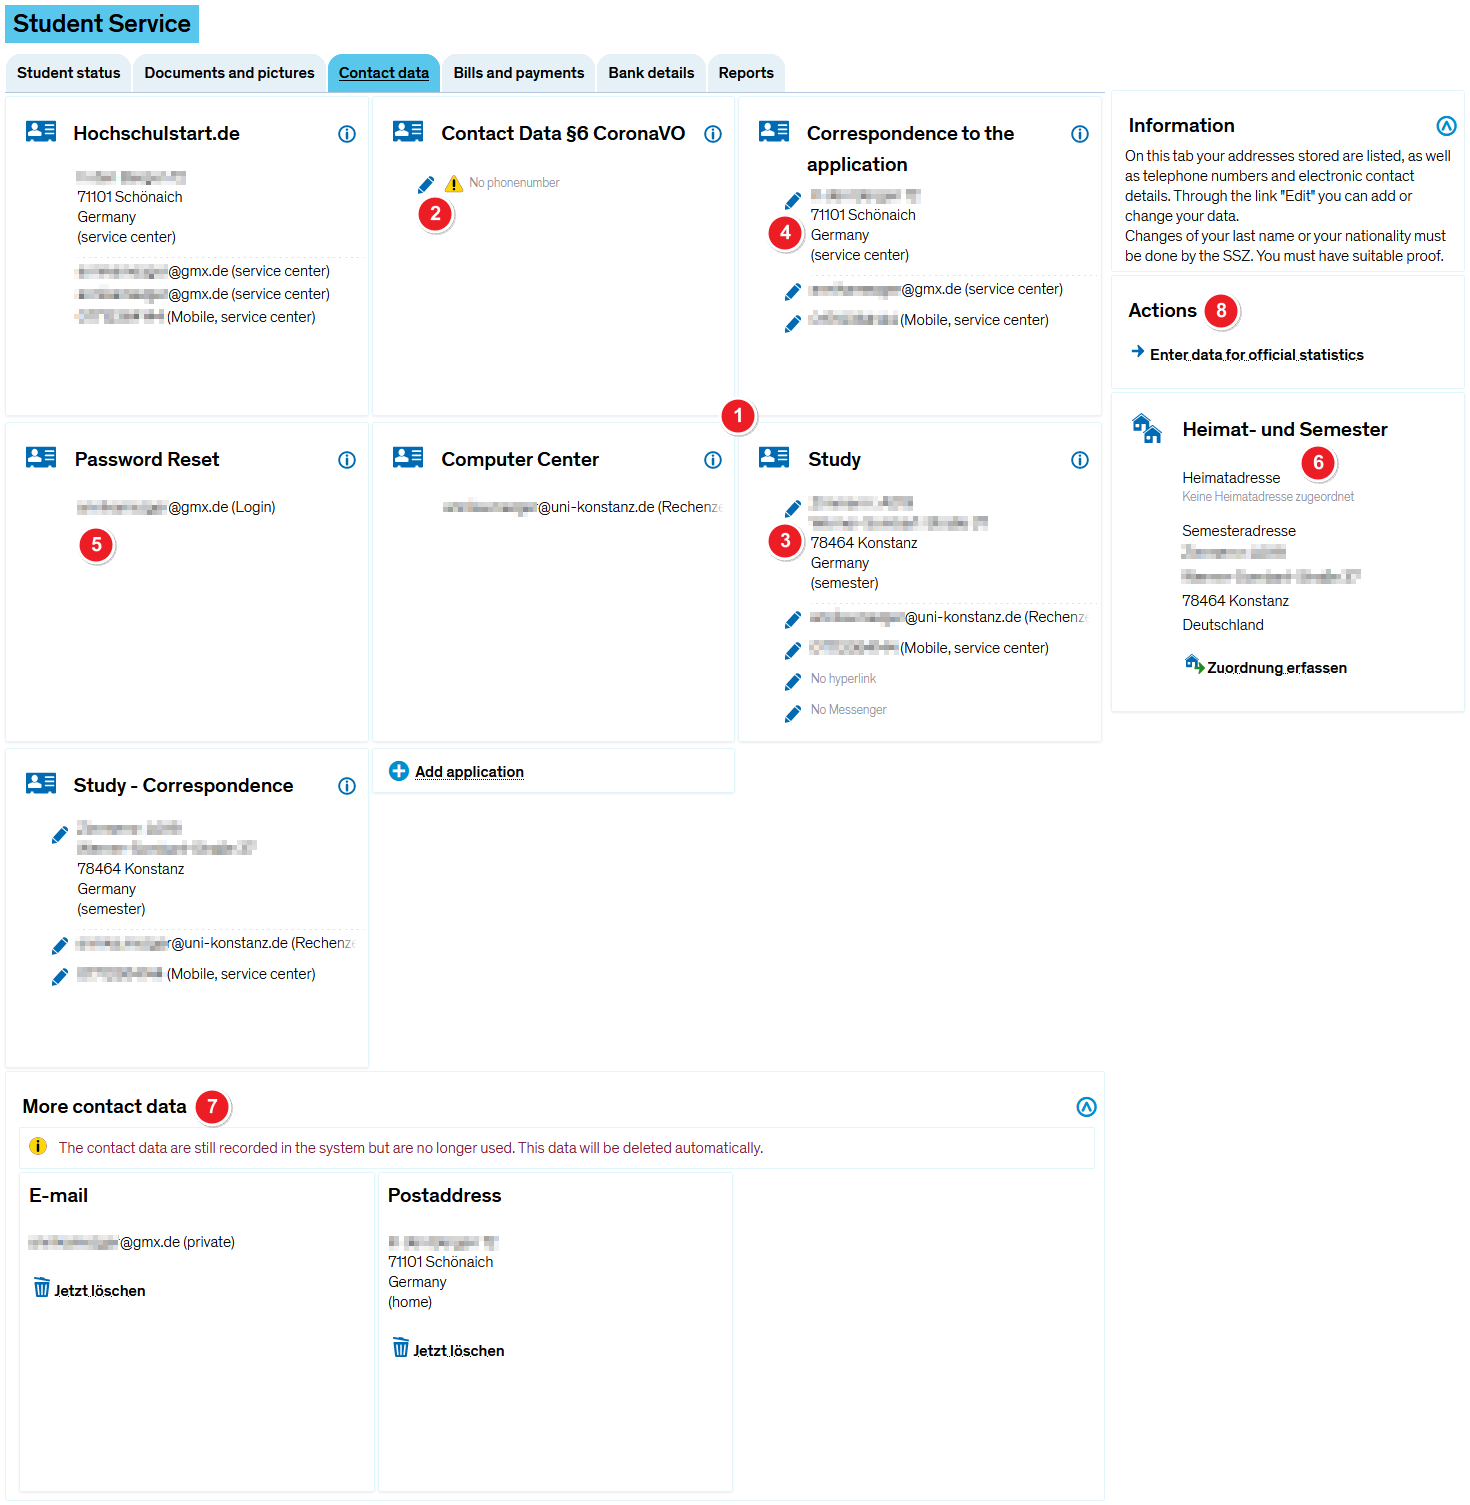
| style="text-align: left; vertical-align: top;" |On the single tiles you find the different <span style="color: #008000;">'''applications'''</span> for all available contact data. The following <span style="color: #008000;">'''applications'''</span> are possible: | | style="text-align: left; vertical-align: top;" |On the single tiles you find the different <span style="color: #008000;">'''applications'''</span> for all available contact data. The following <span style="color: #008000;">'''applications'''</span> are possible: | ||
*''Hochschulstart.de'': only available if you have managed your application via the central awarding office; it contains contact data which have been delivered by hochschulstart.de; changes are only made by import of hochschulstart.de data; the application will be removed by the semester data clean-up. | *''Hochschulstart.de'': only available if you have managed your application via the central awarding office; it contains contact data which have been delivered by hochschulstart.de; changes are only made by import of hochschulstart.de data; the application will be removed by the semester data clean-up. | ||
*''Korrespondenz zur Bewerbung'': contact data which are used for correspondence with you as an applicant. The application will be removed by the semester data clean-up if you are not an applicant any more. | *''Korrespondenz zur Bewerbung'': contact data which are used for correspondence with you as an applicant. The application will be removed by the semester data clean-up if you are not an applicant any more. | ||
| Line 31: | Line 32: | ||
|- | |- | ||
| style="text-align: left; vertical-align: top;" |[[File:ZEuS_Stempel4.png|none|24x24px]] | | style="text-align: left; vertical-align: top;" |[[File:ZEuS_Stempel4.png|none|24x24px]] | ||
| style="text-align: left; vertical-align: top;" |Autenthification ZEuS is processed by the central university account. For this reason a password reset can only be made on the [https://www.uni-konstanz.de/zugangsdaten-vergessen/ KIM website]. Have a look at the [[ZEuS Login|Login to ZEuS]] article to learn more. | | style="text-align: left; vertical-align: top;" |Autenthification ZEuS is processed by the central university account. For this reason a '''password reset''' can only be made on the [https://www.uni-konstanz.de/zugangsdaten-vergessen/ KIM website]. Have a look at the [[ZEuS Login|Login to ZEuS]] article to learn more. | ||
|- | |- | ||
| style="text-align: left; vertical-align: top;" |[[File:ZEuS_Stempel5.png|none|24x24px]] | | style="text-align: left; vertical-align: top;" |[[File:ZEuS_Stempel5.png|none|24x24px]] | ||
| Line 45: | Line 46: | ||
==Processing of your own contact data== | ==Processing of your own contact data== | ||
You can edit the data sets of the different applications yourself if you see a [[File:ZEuS_icon_Stift_blau.png]] symbol for start of processing. | |||
{{mb-info| | {{mb-info|Data processing for '''all applications''' and for '''all contact elements''' - thus ''address'', ''Email'', ''phone'' etc. - is made analogous to the example which is illustrated as follows. You can choose the corresponding elements which are available in each case. So if you edit an address you can see all available addresses, if you edit an Email or phone number also the appropriate data.}} | ||
In | In this paragraph you learn how to edit data in the editing mode by clicking on the [[File:ZEuS_icon_Stift_blau.png]] symbol. For this, a separate popop window opens. It is shown and explained examplarily for the adjustment of a postal address of the ''Studium'' (studies) application. | ||
{| style="border: 2px; border-style: solid; border-color: #00a9e0; width: 100%;" cellspacing="5" | {| style="border: 2px; border-style: solid; border-color: #00a9e0; width: 100%;" cellspacing="5" | ||
|- | |- | ||
| style="width: 33%;" | | | style="width: 33%;" | | ||
{{Klappbox-bluespice|[[File:ZEuS_icon_Screenshot.png|ZEuS_icon_Screenshot.png]] '' | {{Klappbox-bluespice|[[File:ZEuS_icon_Screenshot.png|ZEuS_icon_Screenshot.png]] ''Edit contact data'' - step 1|2= [[File:ZEuS Stud SService Kontaktdaten Bearbeiten en.png|none]]}} | ||
|} | |} | ||
| Line 60: | Line 61: | ||
|- | |- | ||
| style="text-align: left; vertical-align: top; width: 50px;" |[[File:ZEuS_Stempel1.png|none|24x24px]] | | style="text-align: left; vertical-align: top; width: 50px;" |[[File:ZEuS_Stempel1.png|none|24x24px]] | ||
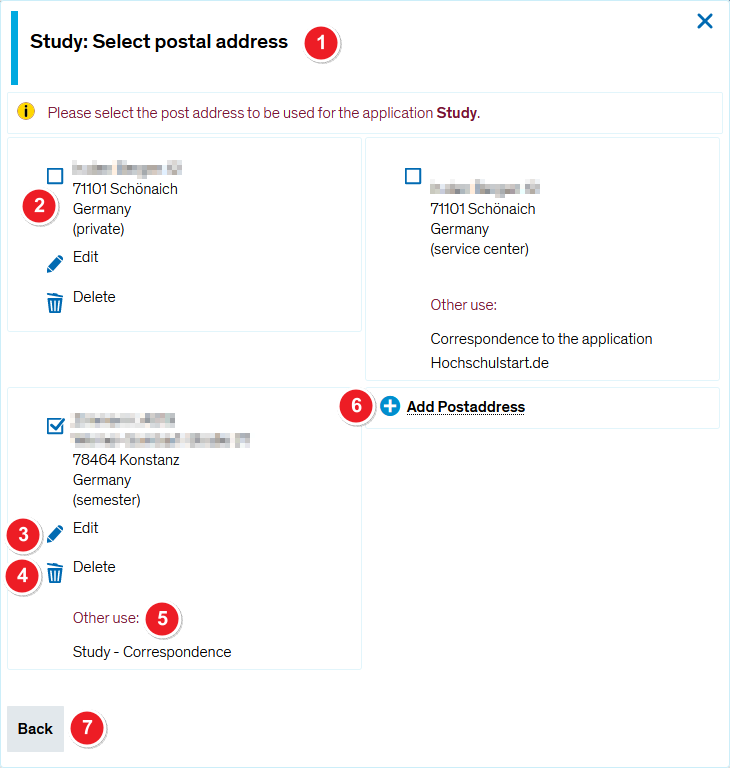
| style="text-align: left; vertical-align: top;" |In | | style="text-align: left; vertical-align: top;" |In the heading line of the popup window you can see the ''application'' as well as the contact data element you have chosen for processing. | ||
|- | |- | ||
| style="text-align: left; vertical-align: top;" |[[File:ZEuS_Stempel2.png|none|24x24px]] | | style="text-align: left; vertical-align: top;" |[[File:ZEuS_Stempel2.png|none|24x24px]] | ||
| style="text-align: left; vertical-align: top;" | | | style="text-align: left; vertical-align: top;" |All addresses which you have entered in ZEuS are listed here. Activate the checkbox of the addresses which you want to be used for the chosen application. Possibly, multiple choice is not possible for each application. For example, you can enter only one address for correspondence, and not several. | ||
|- | |- | ||
| style="text-align: left; vertical-align: top;" |[[File:ZEuS_Stempel3.png|none|24x24px]] | | style="text-align: left; vertical-align: top;" |[[File:ZEuS_Stempel3.png|none|24x24px]] | ||
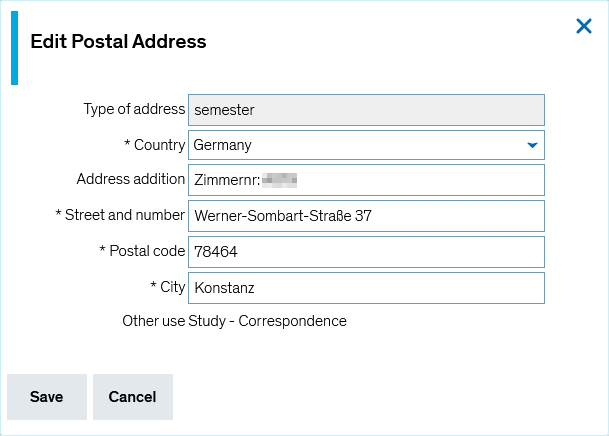
| style="text-align: left; vertical-align: top;" | | | style="text-align: left; vertical-align: top;" |If you want to '''change data''' click on the [[File:ZEuS_icon_Stift_blau.png]] symbol next to the data. Thereupon, a new popup window for data entry and processing is opened. | ||
{{Klappbox-bluespice|[[File:ZEuS_icon_Screenshot.png|ZEuS_icon_Screenshot.png]] | {{Klappbox-bluespice|[[File:ZEuS_icon_Screenshot.png|ZEuS_icon_Screenshot.png]] Contact data - editing mode|2= | ||
[[File:ZEuS Stud SService Kontaktdaten Bearbeiten Anschrift en.png|none]] | [[File:ZEuS Stud SService Kontaktdaten Bearbeiten Anschrift en.png|none]] | ||
}} | }} | ||
|- | |- | ||
| style="text-align: left; vertical-align: top;" |[[File:ZEuS_Stempel4.png|none|24x24px]] | | style="text-align: left; vertical-align: top;" |[[File:ZEuS_Stempel4.png|none|24x24px]] | ||
| style="text-align: left; vertical-align: top;" | | | style="text-align: left; vertical-align: top;" |Clicking on the [[File:ZEuS_icon_X.png]] symbol will '''delete''' data. Afterwards, the address, phone number oder Email will not be available in ZEuS any more. | ||
|- | |- | ||
| style="text-align: left; vertical-align: top;" |[[File:ZEuS_Stempel5.png|none|24x24px]] | | style="text-align: left; vertical-align: top;" |[[File:ZEuS_Stempel5.png|none|24x24px]] | ||
| style="text-align: left; vertical-align: top;" | | | style="text-align: left; vertical-align: top;" |If the data record is linked with any application else, this is shown under '''Other use'''. | ||
|- | |- | ||
| style="text-align: left; vertical-align: top;" |[[File:ZEuS_Stempel6.png|none|24x24px]] | | style="text-align: left; vertical-align: top;" |[[File:ZEuS_Stempel6.png|none|24x24px]] | ||
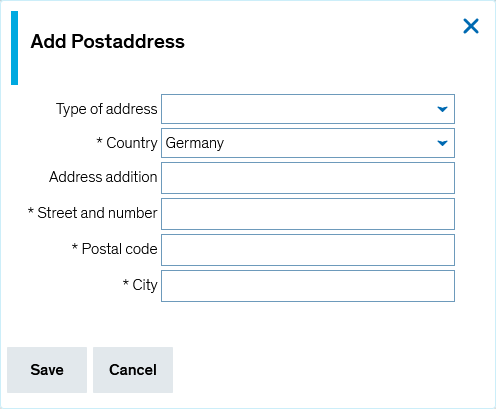
| style="text-align: left; vertical-align: top;" | | | style="text-align: left; vertical-align: top;" |Here you can create a new contact data element. Depending on the element which you edit right now, one of the following buttons is available: '''Add Postaddress''', '''Add E-Mail''' or '''Add Phonenumber'''. | ||
{{Klappbox-bluespice|[[File:ZEuS_icon_Screenshot.png|ZEuS_icon_Screenshot.png]] | {{Klappbox-bluespice|[[File:ZEuS_icon_Screenshot.png|ZEuS_icon_Screenshot.png]] Add new data|2= | ||
[[File:ZEuS Stud SService Kontaktdaten Bearbeiten AnschriftNeu en.png|none]] | [[File:ZEuS Stud SService Kontaktdaten Bearbeiten AnschriftNeu en.png|none]] | ||
}} | }} | ||
|- | |- | ||
| style="text-align: left; vertical-align: top;" |[[File:ZEuS_Stempel7.png|none|24x24px]] | | style="text-align: left; vertical-align: top;" |[[File:ZEuS_Stempel7.png|none|24x24px]] | ||
| style="text-align: left; vertical-align: top;" | | | style="text-align: left; vertical-align: top;" |Clicking the '''Back''' button you return to the ''Contact data'' tab. | ||
|} | |} | ||
Revision as of 11:14, 23 March 2020
Einführung
Go to the My data tab to view and edit your contact details. Keep reading to find out about the features and editing options.
Overview of your current contactdata
After opening this menu item you get the following view. Have a look at all of your contact data that exist at the University of Konstanz.
On the single tiles you find the different applications for all available contact data. The following applications are possible:
| |||
| You can generally edit data with an edit symbol | |||
| The data your entered during application, deposited in the Korrespondenz zur Bewerbung and the Hochschulstart.de sections - provided that your application has been processed by the central office -, are not important during studies any more. The will automatically be deleted by the semester clearing up process. | |||
| Autenthification ZEuS is processed by the central university account. For this reason a password reset can only be made on the KIM website. Have a look at the Login to ZEuS article to learn more. | |||
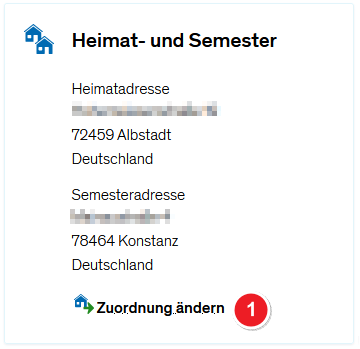
In the Heimat- und Semester (home and semester) section you can see on which of the available locations you normally stay during the semester and where - if differing - you are at home. This information is necessary for statistics. So you should update your data if you are moving which implies changes. Please scroll down to the Assigning home and semester address section to learn more about how to change the assignment.
| |||
| Deposited addresses which are not used for any application (any more) will be listed in the More contact data section. Either, you can delete them yourself by clicking on the | |||
| In the Actions section you find the hyperlink Enter data for official statistics. Clicking on it, you will get to a page where you can provide details concerning your citizenship and your university career if they are not complete. The data will be transmitted to the statistical offices and are mandatory because of the Higher Education Statistics Act. Look at the Student service - Information about official statistics page to get further information. |
Processing of your own contact data
You can edit the data sets of the different applications yourself if you see a ![]() symbol for start of processing.
symbol for start of processing.
 |
Data processing for all applications and for all contact elements - thus address, Email, phone etc. - is made analogous to the example which is illustrated as follows. You can choose the corresponding elements which are available in each case. So if you edit an address you can see all available addresses, if you edit an Email or phone number also the appropriate data. |
In this paragraph you learn how to edit data in the editing mode by clicking on the ![]() symbol. For this, a separate popop window opens. It is shown and explained examplarily for the adjustment of a postal address of the Studium (studies) application.
symbol. For this, a separate popop window opens. It is shown and explained examplarily for the adjustment of a postal address of the Studium (studies) application.
Assigning home and semester address
In diesem Abschnitt erfahren Sie, wie Sie die Heimat- und Semester-Adresse festlegen oder die vorhandene Zuordnung ändern.
Schritt 1: Bearbeitungsmaske aufrufen
Diese Angaben finden Sie im rechten Bereich des Fensters in der Rubrik Heimat und Semester. Starten Sie den Bearbeitungsprozess wie folgt:
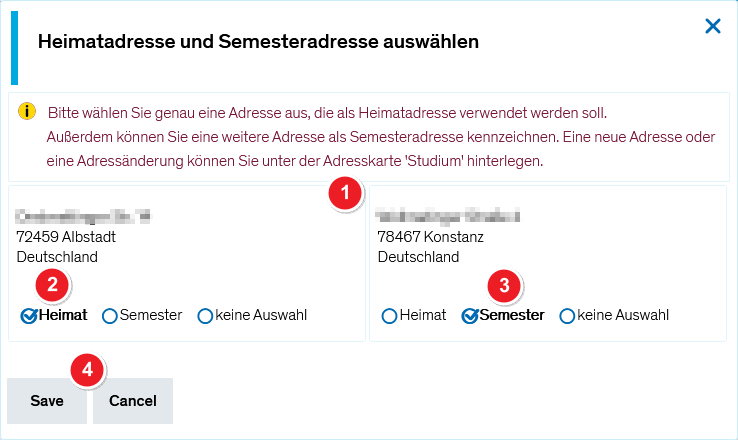
In beiden Fällen öffnet sich ein Popup-Fenster. |
Schritt 2: Zuordnung bearbeiten
| Sie sehen alle verfügbaren Adressen in separaten Rahmen. | |||
Wählen Sie durch Klick auf den entsprechenden Auswahlbutton die gewünschte Option für die Adresse aus:
| |||
| Sichern Sie Ihre Angaben durch Klick auf Speichern, so dass das Popup-Fenster geschlossen wird. |
